In our previous blog on the TMX series, we explored the concept of Detect, Recognize, and Identify (DRI) and how it has influenced camera design. We described how DRI is affected by several direct influences, such as the MTF of the sensor and the VEM function in the camera.
One topic related to DRI that we have yet to discuss is color processing. Color images provide more information compared to monochrome images, making it easier to detect, recognize or identify an object or person. Color can help distinguish between objects of the same shape or category. Furthermore, color processing allows the viewer to have a better understanding of the scene being monitored. This blog explores the challenges and achievements of processing color images in the TMX series cameras.
Color processing is a digital aspect of the camera and requires knowledge of the application. For example, cameras in broadcasting need images that match human perception. The camera systems used in surveillance require images to have higher contrast so that objects can be identified easily. During the development of the TMX series, Adimec has created several algorithms that optimize the color processing for global security applications to achieve the best possible DRI.
White balance
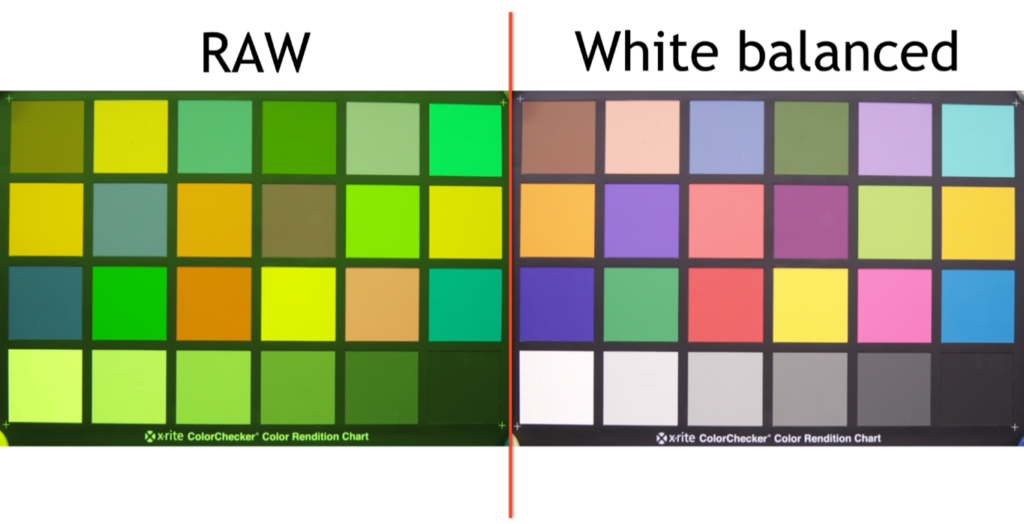
First, let’s discuss white balance and why it is so important. Our eyes are not sensitive to all wavelengths. In addition, our sensitivity differs to the wavelengths that we can perceive. This exact effect also occurs in image sensors. A color image sensor consists of an array of pixels that can only perceive one color: red, green, or blue (RGB). This is called a Bayer pattern. There are twice as many green pixels present as there are red or blue pixels. This way, the pattern matches the human eye, which is more sensitive to green. As a result, there is more green in the images compared to red and blue. Figure (1) shows this greenish effect in the RAW image that was taken from a color chart with a TMX camera. The white balance feature in the camera corrects for the Bayer pattern and yields a color-balanced image, shown on the right. The left image is a RAW image directly from the sensor.

Figure 1 Comparison RAW color image against a white balanced image
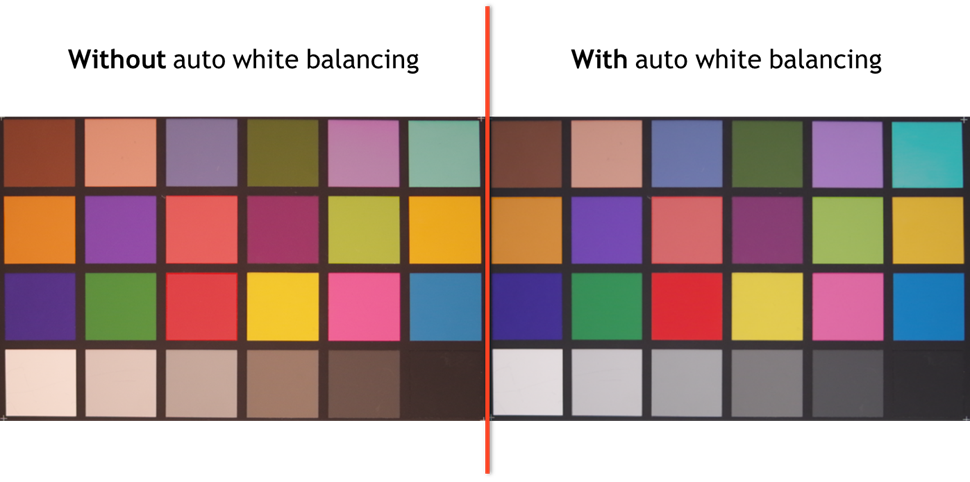
The white balance does not only depend on the image sensor. An even greater challenge is the environmental conditions. Let’s look at an example where the camera is used right before the sun sets. In these conditions, the surroundings often look warmer and more yellowish due to the atmosphere letting through more red wavelengths than blue or green. As you can see in figure (2), the white in the bottom row turns more yellowish, due to there being more red light present in the scene. The auto white balance function automatically corrects for this by making the camera less sensitive to the red colors while increasing sensitivity to the other colors. This result is the image on the right in figure (2). Adimec offers an automatic white balancing function in all of its color TMX cameras to obtain an accurate color representation from sunrise to sunset.

Figure 2 The effect of automatic white balancing in scenes
Figure 2 is an example of a possible scene that could be encountered. However, the auto white balance function in the TMX series works for all scenarios. It ensures that all colors are equal in every scene.
Most white balance implementations use the so-called “gray world” principle. This introduces the risk that with large, colored objects in the scene, the camera will white balance one of the colors, therefore resulting in false color representation. Adimec’s advanced white balance algorithm understands these conditions and keeps the white balance as-is.
The Adimec white balance algorithm uses CIE-defined luminants to define white in its white balance algorithms. In particular, the D65 illuminant is used to define white. To ensure that the camera white balances to the correct color temperature, it must account for filters and optics transmission characteristics. Adimec supports customers to obtain the correct camera parameters for white balancing for their specific filters and/or optics.
Edge enhancement
Color processing is more than achieving a true accurate image™ of reality. It is also a main factor in sharpness and contrast. The Bayer pattern in a color sensor at first reduces the resolution of the sensor because pixels are sensitive to only one color. These colors are then interpolated to get an RGB value for each pixel. This way, color data lost due to the Bayer pattern is retrieved, but the effective spatial resolution will be reduced with respect to a monochrome camera
The edge enhancement algorithm in the TMX camera amplifies the edges to create an image that appears sharper. This feature can be used to increase the MTF, which in turn leads to an improvement in DRI.

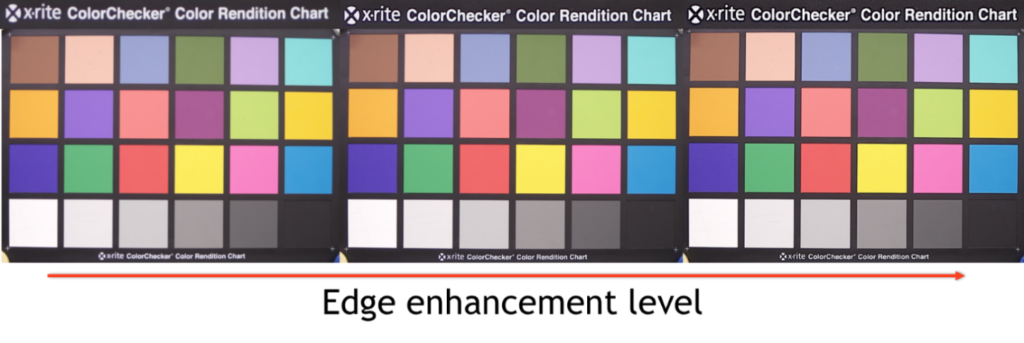
Figure 3 Edge enhancement level whit increasing levels to the right.
Figure (3) shows three images: the one without edge enhancement is on the left side; the other images have increasing edge enhancement levels. The effect of the edge enhancement is most visible on the text in the chart.
Although there is slightly more noise present in the image on the right, it is observed as sharper when compared to the left image. Sharpening these edges will show a significant improvement in the overall clarity of the image, which will therefore be interpreted as an image with more detail.
A benefit of the color camera is that the demosaicing algorithm blurs the image and therefore mitigates the noise. To further mitigate the noise that may be added due to the edge enhancement, a noise reduction algorithm is implemented.
Color noise suppression
The drawback of digitally increasing contrast and sharpness is the addition of noise and in some cases a loss of color accuracy. The same goes for low-light situations, where it often is required to increase the gain of the camera to better see in the dark. The gain introduces a certain amount of temporal noise into the image. In color cameras, this temporal noise is processed by color processing and translated to colors as well. The human eye is not capable of filtering this type of noise efficiently, which indirectly leads to a decreased DRI ability.
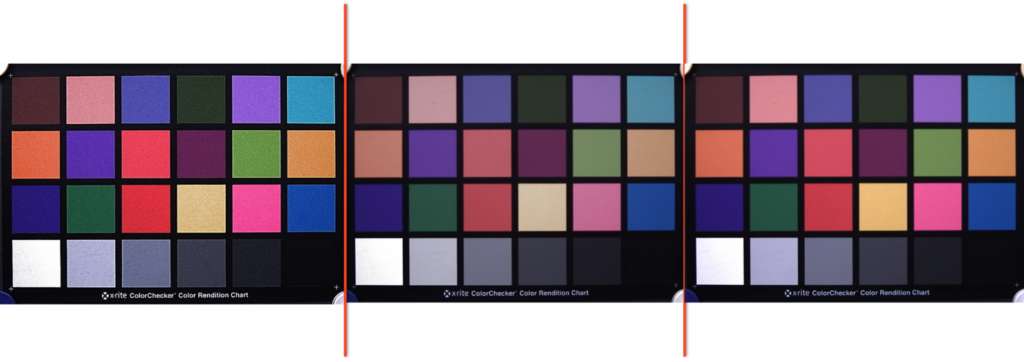
To help with this, Adimec developed a color noise suppression algorithm that automatically suppresses the color noise by reducing the saturation of the image. This way, the color noise is perceived as luminance noise, which is easier for the human eye to filter and “see through”. In contrast to regular day/night security implementations, it allows the system to maintain color information in the scene but with lower saturation and thus lower fatigue to the observer. Figure (4) demonstrates the color preservation in low light. The left image has maximum edge enhancement without noise suppression, the center image has noise suppression, and on the right the same level of edge enhancement and noise suppression is aided by the color preservation.

Figure 4 Comparison of the saturation effect of noise suppression in an image
In this comparison, the noise induced by the edge enhancement is reduced. However, this will reduce the saturation of the colors, which is an unwanted effect. Therefore, Adimec developed a color preservation correction to enhance the saturation of the colors. This will result in an image with increased sharpness and minimal noise: a true accurate image™.
Conclusion
As demonstrated in this blog, even though color processing can contribute to a better DRI ability, there are many different aspects to color processing that can influence the DRI ability. Adimec has increasingly built knowledge about these challenges over the years, and translated this to several color processing algorithms that can be used to obtain an optimal DRI result. Due to the flexibility Adimec offers in its user interface, these algorithms can be optimized for specific use cases, and can even be customized to other system variables such as color filters. Our team of vision experts are happy to help you optimize these features in your system and application to achieve the best possible results.
 English
 日本語
日本語 简体中文
简体中文


